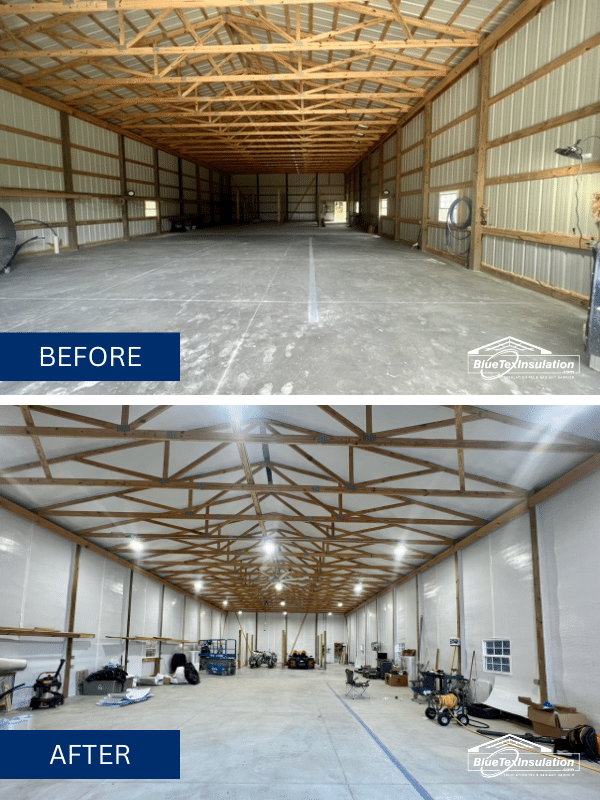
Metal Building Insulation - How To Insulate Existing Wood-Framed/Pole Barn Buildings
For this application, the basic goal is to create an “envelope” inside the frame, made from BlueTex™ insulation. Wood-framed structures are generally easy installations because you have many options for attaching the BlueTex™ to the frame. Our self-drilling screws and washers work best, but you can also use roofing cap nails or heavy duty staples.
With a wood frame, you can install BlueTex™ insulation vertically (up/down) or horizontally (left/right) across the frame. We recommend a vertical install so the seams end on the frame, which makes sealing them much easier, but you can install horizontally if that's easier.
The objective is to create an interior air barrier, vapor barrier and thermal barrier. Preferably the foil side of the insulation faces the exterior of the building and utilizes the gap created by the framing for the required airspace. This air gap allows the foil side to reflect radiant heat before it enters the interior of the building. You can Install BlueTex™ Insulation either vertically or horizontally.
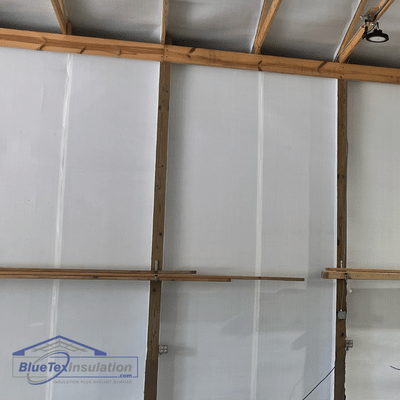
Before you begin, there are two approaches to install you can take. Some people prefer to install in-between the frame so the wood is still visible, while others choose to go across the face of the studs so the wood is hidden behind the BlueTex™. If you plan to cover the face of the wood, then the vertical installation method is the best option. Remember, as long as you can seal your seams air tight, you can install it how you prefer for your finished look.
Because not all buildings are identical, you may have to get creative with your installation when you have an existing building you're trying to retrofit for BlueTex™ insulation. If you have a specific question about how to install BlueTex™ in your building and don't feel like we give you enough information in these directions, please email us pictures and/or drawings and we will be glad to help you. You can also call us at 800-595-8772 for live technical support about our products and installation.
STEP 1
START AT THE BOTTOM: Use the floor of the building and the bottom part of the framing as your guide to start the first run. Install BlueTex™ so that the foil side is facing out of the building (away from you) with the adhesive edge facing the OUTSIDE of the building.
 Use your fasteners with washers to attach BlueTex™ to the inside of the wood framing.

You can easily pre-paint or cover the heads of the fasteners/washers with our matching tape to make them disappear, so don't worry too much about how they look at this point.
Continue with this around the entire perimeter of the building until you're done with the first run. Use our 3" wide matching tape to reinforce your seams. Remember to press firmly to fully attach the tape.
STEP 2
FINISH WALLS: Move up to the second run. Start by positioning the bottom of the second piece so that it is overlapping the top edge of the bottom piece by at least 3-4" (a larger overlap is OK too). If you're installing vertically, line up your second piece so that it overlaps the first piece and secure it so you can pull tight to the other side of the cavity.
Before you attach the insulation into the rafters studs, pull it tight across the wall to make sure the seam between pieces is tight and level. Once it's straight, nail or screw it along the bottom of the piece of insulation to secure it in place. Then secure it at about every 2' to 3' across the width, all the way up each stud.

If needed, use your seam tape to help you make any seams or edges look finished and extra clean.

After you finish the second run, REPEAT with the next run of foil and continue following steps 1 and 2 until you reach the top of your wall.
STEP 3
THE ROOFLINE: Keep running the insulation up the wall and continue onto the bottom of the roofline.

Nail or screw it into the wood securely along the way, remembering to keep it as tight as possible for the best finished look.

At the Roof Ridge: Overlap the insulation 6” on the ridge of the roof and use tape to secure it.

*Note: Some customers choose to do the roofline only to help control condensation from above. If this is your goal, this video may be helpful for you to understand how to best achieve this:
STEP 4
FINISH UP:
Finish closing/taping all the seams on the walls and roofline. Use extra tape to “clean up” any exposed seams or loose pieces from cutting.

Tape is also a good way to cover up any cap nails or other fastener heads at this time.

STEP 5*
*This step is optional
INTERIOR FINISH: You can leave the interior layer of BlueTex™ exposed (regardless of if you're using the foil finish or the white finish) and the install will be done.

If you want a completely finished look however, you can cover the BlueTex™ with just about anything for an interior finish! Depending on your application and what you use the building for, the most common interior finishes are OSB, plywood, or drywall to secure shelving, signage, racks, etc.

If you have any questions about this install process, contact us! We are the experts and help guide customers on how to insulate their metal buildings every day. Contact us at 800-595-8772 or via our Contact Form.